SSL Errors

SSL Handshake Failed Error — Ultimate Guide by Experts

6 votes, average: 3.67 out of 56 votes, average: 3.67 out of 56 votes, average: 3.67 out of 56 votes, average: 3.67 out of 56 votes, average: 3.67 out of 5 (6 votes, average: 3.67 out of 5, rated)
Loading...

How to fix one of the most common SSL/TLS errors – SSL Handshake Failed Error

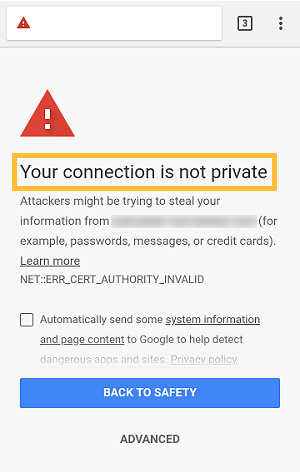
An SSL handshake is a process that begins when your browser sends a secure connection request to a web server such as Apache. However, in some cases, you might get the message “SSL Handshake Error” or “SSL Handshake Failed.”

If you’re confused about what that message means, we have the answers. Read on to find out what’s the SSL Handshake Failed Error, why it occurs, and how to fix SSL handshake error.

Cause of SSL Handshake Error

“SSL Handshake Error” is a message you receive when the SSL handshake process fails.

After you send the secure connection request to the web browser, the browser is supposed to send a public key to your computer that’s automatically checked against a list of certificate authorities. Once the certificate has been received, the computer generates a key and encrypts it using the public key.

The SSL Handshake Error occurs if the read access has not been granted to the OS, thus preventing the web server from completing authentication. It indicates that the browser’s connection to the web server isn’t secure.

This can be caused for a number of different reasons:

  • The SSL/TLS protocol being requested is not supported by the server
  • The cipher suite being requested is not supported by the server
  • The hostname in the URL doesn’t match what’s on the certificate
  • The certificate chain is invalid or incomplete
  • The certificate has expired and or is no longer valid
  • The client or server cannot communicate with the SNI servers

Unfortunately for users, many of these issues are server-side and cannot be fixed by you. But there are a few things you can try.

How to Fix SSL Handshake Error

You may be able to fix SSL Handshake Error by following these steps:

  • The .KYR file and the .STH file should have the same prefix. For example, both the files should be called FILE1.KYR and FILE1.STH.
  • Your operating system must have read access to the .STH file. Without read access, the web server cannot complete the authentication process.

Troubleshooting SSL Handshake Failed Apache

“SSL Handshake Failed” errors occur on Apache if there’s a directive in the configuration file that necessitates mutual authentication.

In order to fix the SSL Handshake Failed Apache Error, you have to follow these steps:

Open the conf file.

  • Replace “SSLVerifyClient” or “SSLVerifyClient optional_no_ca” to “SSLVerifyClient none” and then restart Apache.
  • If there’s an “SSLVerifyDepth 1” line in the conf file, you can remove it by adding the “#” sign before it, for example, “#SSLVerifyDepth 1”.

Checking your SSL/TLS protocol support

While every browser is different, there is a way to go into the settings and make sure that you have support for the latest TLS versions turned on. This is typically done by default, though if you’ve tweaked your settings before that may impact how new features roll out.

Go into your settings and click advanced. Then scroll down to the security settings and open up your SSL/Proxy option.

You want to make sure that you’ve got support for SSL 2.0 and SSL 3.0 turned off, you may also wanted to disable TLS 1.0 and TLS 1.1, as both of those are being phased out, too. You definitely want TLS 1.2 and TLS 1.3 to be supported, as those are the most modern and safest variants of TLS.

Re-Issue your SSL/TLS certificate

For most site owners facing this problem a simple re-issuance and re-installation may fix the problem. Specifically with errors that stem from an incorrect certificate. You can also use this as an opportunity to tweak the TLS versions you’re supporting so that they support the more modern protocols. Unlike browsers, this change typically isn’t made for you server-side, so if you haven’t updated since TLS 1.0 you should probably get to it.

Buy SSL Certificates – Save 74%

Your Connection is Not Private Android – How to Fix It Guide

1 Star2 Stars3 Stars4 Stars5 Stars (11 votes, average: 3.73 out of 5)
Loading...

Your Connection is Not Private on Android Device – The step-by-step guide on fixing Android connection errors

A lot of Android internet users have recently been complaining about a “Your Connection is Not Private” Android error that they encounter while surfing the internet on their Android phones. This is a common SSL connection error and it’s easy to remedy.

In this article, we’ll show you what this error means and how to fix it.

Android Device SSL Error

Diagnosing the SSL Connection Error Android

The “Your Connection is Not Private” Android error occurs because of some issue with the SSL connection. In most cases, you can simply fix it by refreshing the page. However, sometimes, the issue might be a little deeper.

If the issue lies with the server or the website, you can’t really do anything about it. To figure that out, you can try accessing other SSL secured websites like Google and Facebook as well. If they can be properly loaded, there must be some issue with the website you’re trying to access.

If you can’t access any website, the problem lies in your device. You can fix the issue by going through the following solutions.

How to Fix Security Certificate Error Android


Step 1. Check Date and Time

If the time in your device’s clock doesn’t match the time in the web server, the SSL certificate of the website won’t get verified, leading to the SSL Connection Error Android. In this case, you need to go to Settings > Date & Time, and Toggle ON the “Automatic Date & Time” function to sync with the network-provided time.

Date and Time Setting in Android

Step 2. Check Internet Connection & Internet Settings

The SSL Certificate Error Android might also appear because of an issue with the internet connection or your internet settings.

You can diagnose this issue by trying to connect to the same site from another internet connection, either a 4G connection or another WiFi network. To determine if the issue lies with your phone’s internet settings, try accessing the website from another phone.

If you can access the website from another network, the issue lies with the internet connection. If you can access the website from another phone but the same network, the issue lies with your phone’s internet settings.

If the issue lies with the internet connection, you can contact your internet providers.

Step 3. Clear Browsing Data

The cache and cookies in your web browser sometimes cause the “Your Connection is Not Private” Android error. As such, you can clear the browsing data from your phone.

For Chrome, you have to access the browser, go to the Menu (3 dots) > Settings > Advanced > Privacy > Clear Browsing Data. Now select the “All Time” option and tap on “Clear Data”. This will clear your cache completely.

Clear Browsing Setting in Android Device

Step 4. Disable Antivirus

Antivirus apps sometimes cause an interference with the SSL connection, preventing you from accessing the website. Try disabling your antivirus and access the website again. After you’ve tested it, you can turn it on again.

Step 5. Perform Factory Reset

If everything else fails, it’s possible that your phone has been infected by some malware. As such, you should get rid of it before it can cause any more damage. To do so, you’ll have to factory reset your phone.

Go to Settings > Backup and Reset > Factory Data Reset. Be sure to backup all your important files before doing this as it will wipe all your data clean.

In all likelihood, you won’t have to do something as drastic as performing a factory reset. One of the earlier simpler solutions should fix the Security Certificate Error Android.

Other Important Resources

Purchase RapidSSL Wildcard Certificate

Secure main website and unlimited subdomains on the multiple servers with one RapidSSL Wildcard Certificate.

Shop for RapidSSL Wildcard Now and Save Up to 60%!

A Guide to Solve Net Err_Cert_Revoked SSL Error Code

1 Star2 Stars3 Stars4 Stars5 Stars (6 votes, average: 4.33 out of 5)
Loading...

Net Err_Cert_Revoked Error is Critical Challange for Developer, Let’s Fix It Through The Ultimate Guide

If you’re a web developer or website owner currently reading this article, it’s likely that you have come across an SSL certificate related error. There are a lot of SSL certificate errors out there, but one of the most common and pernicious error is the net err_cert_revoked error or the sec_error_revoked_certificate error. Both of these errors are actually one and the same and can be fixed by following a number of steps.

In this article, we’ll show you how to fix the net err_cert_revoked error on Chrome for Windows and the net err_cert_revoked error on a Mac.

Solve net err_cert_revoked error on a Mac

Users on Mac OS X might receive the net err_cert_revoked error while accessing any number of “https” websites. This error prevents the user from accessing the website.

In order to solve net err_cert_revoked error on a Mac, you need to follow these steps:

Step 1: Go to Keychain Access > Login on Mac.
Step 2: Delete two specific certificates: “UTN DATACorp SGC” and “AddTrust External CA Root”.
Step 3: Quit both Keychain Access and your web browser.
Step 4: Now reopen the web browser and enter the website address.

This should likely fix the issue.

Solve net err_cert_revoked error Chrome for Windows

When it comes to solving the net err_cert_revoked error in Windows 10, you have to go through a number of different options. You need to use the Trial and Error method to diagnose the problem and solve net err_cert_revoked error on Chrome.

Date & Time

Connectivity between a computer and a remote server are often disrupted because of incorrect time and date settings. In order to fix this, follow these steps:

Step 1: Go to Control Panel > Clock, Language, and Region > Date & Time.
Step 2: Correct all the settings.
Step 3: Restart your computer and try to enter the website again.

Antivirus & Firewall

One’s antivirus and firewall and can also often cause connectivity issues. You can test this out and try to solve the net err_cert_revoked error by turning off all your antivirus programs. To do so, go to Settings > Additional > Network. From this page, you should be able to select your Antivirus or Firewall and disable or modify them.

Boot

Sometimes a net err_cert_revoked error is caused by a third-party application or service. In order to find out which one is causing the issue, you can clean the boot by following these steps:

Step 1: Open RUN (Windows Flag + R) and type ‘msconfig’.
Step 2: From the General tab, unselect the ‘Load Startup Items’ field, but make sure that ‘Load System services’ and ‘Use original boot configuration’ are checked.
Step 3: Go to Services and click on ‘Hide all Microsoft services’.
Step 4: Click on ‘Disable All’.
Step 5: Now Restart your Computer.

Reset Connection

You can also try to Flush DNS and Reset Connections to try and solve the issue.

Disable Extensions

Sometimes, net err_cert_revoked errors in Chrome occur because of a faulty extension you’ve installed. So, delete your extensions one by one and try accessing the website again. If your extensions are at fault, it will help you find out which extensions are responsible so you can remove them.

VPN & Proxy

If you use a VPN service, uninstall it. As for Proxy, you can disable it via the following steps:

Step 1: Open RUN (Windows Flag + R) and type ‘inetcpl.cpl’.
Step 2: Go to Connection > LAN Settings.
Step 3: Check the ‘Automatically Detect Settings’ option and disable the rest.
Step 4: Restart the computer.

Chrome

You can reset Chrome by clearing all your cache, cookies, history, etc. If that still doesn’t work, you can try using the Chrome Canary beta version, which can be downloaded online. The Beta version often doesn’t have many of the bugs that the full Chrome application does.

Turn Off Security Warning

This method should be used as a final resort if the others don’t work because it can make your computer vulnerable. You can do so by following these steps:

Step 1: Open RUN (Windows Flag + R) and type ‘inetcpl.cpl’.
Step 2: Go to Advanced tab.
Step 3: Uncheck ‘Check for publisher’s certificate revocation’ and ‘Check for server certificate revocation’.
Step 4: Apply the settings and restart the computer.

One of the aforementioned methods should fix sec_error_revoked_certificate and net err_cert_revoked error. However, if none of them work, you might have an issue with your internet connection, so try accessing the website from another internet connection and contact your ISP to inform them of the issue.

Other Important SSL Certificate Blog Posts

DV or Domain Validated SSL Certificate

Secure a website with the basic Domain Validated or DV SSL certificates in few minutes. It takes few minutes to get issue and for installation.

Buy DV SSL Certificate and Save 78%